Tampilkan postingan dengan label to. Tampilkan semua postingan

Taskos To Do List for Android

Rabu, 28 Desember 2016

0 komentar
Free, simple & intuitive to do list for android. Now you can add tasks by speaking to your mobile device. With Taskos to you can add, edit or delete tasks, share them with your friends, write notes, set alerts and even make calls!

New features : Share task via Email or SMS, Full Google task sync (multiple lists, multiple accounts, OATH, home screen widget, customized categories, improved sorting, swipe completed tasks, shake to remove tasks, auto-complete, quick edit of tasks information and more!

A top android to do list that actually helps you get your things done.

Key Features Taskos To Do List for Android :
- Speech to text
- Sync to Google Tasks / gTask / gTasks / google apps
- Home screen widgets (4X4, 4X1)
- Share tasks with your friends via Email or SMS
- Quick edit of tasks (Priority, Category, Due date, Share and more)
- Swipe to mark as complete
- Customized categories
- Alerts
- Notes
- Repeatable tasks
- Integration with your Facebook friends, Gmail contacts, Dropbox, Twitter followers, whatsapp or beluga friends.

* Coming versions will sync to: Todo list, Todo, Task List, Remember the milk, gTasks, RTM, Producteev, Springpad, Catch, ColorNote Notepad Notes, Google Calendar, Astrid, Outlook, Microsoft Exchange and more...

* Speech to text requires the google voice search apk

Recent changes Taskos To Do List for Android :
New & Improved sharing (via SMS and Email)
Full Google task sync (Multiple lists, Multiple accounts)
Secured authentication (OAuth)

Taskos To Do List for Android


Read More..

Ways to save BATTERY POWER on Android

Rabu, 05 Oktober 2016

0 komentar
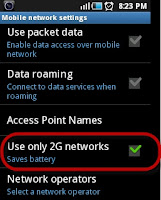
1. Tell the device to only use 2G networks. (Settings » Wireless controls » Mobile networks » Use only 2G networks) If you do not need access to high speed data, or there is no 3G or 4G network where you live, you can tell Android to only use 2G mobile networks. You will still have access to EDGE network data and WiFi if needed.


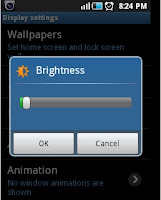
2. Reduce the brightness of your display. (Settings » Sound & Display » Brightness) Most people can see an Android display quite well with the backlighting feature turned off. Move the slider all the way to the left, then try using the device that way. If you cant see it well in that setting, move the slider to the right only as far as necessary to view the display comfortably. Alternatively, Auto brightness coupled with power saving mode (found on most Samsung, LG, Sony, and some Motorola devices) will conservatively adjust the display to the surroundings to only the brightness necessary.


3. If your device has an AMOLED screen, always use a black background. AMOLED screens can reduce power usage sevenfold by displaying black instead of white or any other color. When searching on your phone you can also use Black Google Mobile at bGoog.com to get standard Google results (including images) all in black .

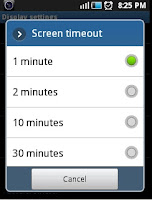
4. Set your screen timeout to the shortest length possible. (Settings » Sound & display » Screen timeout) This setting tells the device to turn off the screen after the selected period of inactivity. The shorter the period, the less power your display will use. The setting options vary from phone to phone.

5. Use the Power Control widget. (Home screen » Menu » Add » Widgets » Power control) As of Android 1.6, there is a widget that you can place on any one of your home screens that gives you quick control buttons for WiFi, Bluetooth, GPS, Push sync, and screen brightness (three levels). Use this to control your settings and turn them off to save battery power, as stated above. This is a nice easy shortcut.

6. Do not leave applications running when you dont need them. Close them and return to the home screen.

7. Switch of wi-fi, bluetooth, data networks when not in use since they consume battery while searching for signals. 

The top free power management apps available in the google play are :

BATTERY SAVER DU 

BATTERY Dr SAVER


Read More..

100 Ways to Make 100 Money

Rabu, 10 Agustus 2016

0 komentar
A Collection of 100 Legitimate Ways to Make $100 a Day!

App Features:

>> Almost 100 Tips to help you Make Money Online!
>> Easy Browsing of Tips!
>> Share Any Tip via Email!

If you’ve been on the internet for more than a few hours, you’ve likely seen at least one advertisement teaching you how to make thousands of dollars a minute, working from your underwear, in the comfort of your own home.

These ads are so ridiculously popular that if you’re like most people, you start doubting whether it really IS possible to make money online.

The truth is, it IS possible. It might be hard to make thousands of dollars a minute from the get-go (or at all), but there are certainly legitimate ways you can make an extra $100 a day working from home with ease.

In this App, We are going to share almost 100 different ways in which you can create more income. We have tried to cover all types of methods for all different personality and skill types, and We are confident that you’ll be able to find at least a few that sound good to you.

While some of them require more work than others, please know that you can mix and match. For example, maybe you can do a few hours of forum moderation at $10 an hour for $30, and then make up the extra $70 doing something else.
100 Ways to Make $100 (Money)


Read More..

How to Root Galaxy S4 Canadian SGH I337M on Android 4 2 2 Jelly Bean Firmware

Selasa, 07 Januari 2014

0 komentar
Samsung Galaxy S4 (Canadian) SGH-I337M users who have already installed their devices with Android 4.2.2 Jelly Bean, may root their devices using the tutorial below.

This tutorial uses CF-Auto-Root file released by recognised XDA Developers, Chainfire. The CF-Auto-Root file allowing Galaxy S4 users to root their devices easily without depending on the firmware. It completely supports Android 4.2.2 Jelly Bean and future firmware as well.

Disclaimer: Rooting voids the warranty of your device. We and the developer of this rooting procedures shall not be held responsible if any undesirable outcomes may happen to your device. use of this root guide is solely at your own risk!

Pre-requisites
1) Install USB Driver for Samsung Galaxy S4 on the computer.
2) Enable USB Debugging Mode on the phone.
3) Make a backup of all your important data before following the guide.
4) Ensure the battery of the phone is charged more than 80 per cent.
5) The CF-Auto-Root file works only on Samsung Galaxy S4 (Canadian) SGH-I337M. Applying this on any incorrect variant will brick the device. Verify the model number of the Galaxy S4 by navigating to Settings >> About Phone.

File Required
1. CF-Auto-Root (Mirror Link) for Galaxy S4 (Canadian) SGH-I337M (CF-Auto-Root-jfltecan-jfltevl-sghi337m.zip)
2. Odin 3.07

Steps to Root Galaxy S4 (Canadian) SGH-I337M Running on Android 4.2.2 Jelly Bean Firmware
Step 1: Extract CF-Auto-Root and Odin 3.07 files using winrar/7zip/winzip or any other extracting tool.
Step 2: Switch off the Galaxy S4. Then boot the device into Download Mode by pressing and holding Volume Down + Home buttons together and then press the Power button until the device turns on. Now press the Volume Up button to enter Download Mode.
Step 3: Launch Odin on the computer.
Step 4: Connect the Galaxy S4 to the computer using USB cable while it is in the Download Mode. Wait until Odin detects the device. When the device is connected successfully, the ID: COM box will turn yellow with the COM port number. Additionally, the successful connected will be indicated by a message saying Added. If Odin fails to detect the device then re-install USB driver
Step 5: In Odin, click the PDA button and select the CF-Auto-Root-jfltecan-jfltevl-sghi337m.tar.md5 file.
Step 6: Verify that Auto Reboot and F.Reset Time checkboxes are selected in Odin. Also, ensure the Re-Partition option in Odin is not selected.
Step 7: Double-check and click Start in Odin. The installation process will now begin.
Step 8: Once flashing completed, your phone will restart and soon you will see a PASS message with green background in the left-most box at the very top of the Odin. You can now unplug the USB cable to disconnect your device from computer.

Samsung Galaxy S4 (Canadian) SGH-I337M running on Android 4.2.2 Jelly Bean firmware is now rooted successfully. You may now install any app that requires root permission.

Thanks to all fellas at XDA who first tried out this rooting technique. This method was originally posted via XDA-Developers original thread.
Read More..

How to Root Galaxy Win Grand Quattro I8552 on Android 4 1 2 Jelly Bean Firmware

Sabtu, 04 Januari 2014

0 komentar
Samsung has released the latest Android 4.1.2 Jelly Bean update for Galaxy Win with model number I8552 also known as Galaxy Grand Quattro. The new official firmware is now available as an Over-The-Air (OTA) update as well as through Samsung KIES.

Samsung Galaxy Win I8552 users who have already installed their devices with Android 4.1.2 Jelly Bean, may root their devices using the tutorial below.

Disclaimer: Rooting voids the warranty of your device. We and the developer of this rooting procedures shall not be held responsible if any undesirable outcomes may happen to your device. use of this root guide is solely at your own risk!

Pre-Requisites
1. Install USB Drivers for Samsung Galaxy Win on your computer.
2. Enable USB Debugging Mode on the phone by navigating to Settings >> Developer Options.
3. Make a backup of all your important data before following the guide.
4. The Galaxy Win should be factory unlocked and not locked to any particular carrier.
5. Ensure the battery of the phone is charged more than 80 percent.
6. The ClockworkMod Recovery (CWM) and SuperSU files works only on Samsung Galaxy Win (GT-I8552). Applying these on any incorrect variant might brick the device. Verify the model number of the Galaxy Win by selecting Settings >> About Phone.

Files Required
1. CWM Recovery (Mirror Link)
2. SuperSU or the latest version
3. Odin 3.07

Steps to Install CWM Recovery on Samsung Galaxy Win I8552
Step 1: Extract Odin .zip files using winrar/7zip/winzip or any other extracting tool.
Step 2: Copy SuperSU .zip file to the SD card of the phone.
Step 3: Switch off the Galaxy Win. Then boot the device into Download Mode by pressing and holding Volume Down, Home and Power buttons together until a construction Android robot icon with a warning triangle appears on screen. Now press the Volume Up button to enter Download Mode.
Step 4: Run Odin on the computer as an Administrator.
Step 5: Connect the Galaxy Win to the computer using USB cable while it is in the Download Mode. Wait until Odin detects the device. When the device is connected successfully, the ID: COM box will turn to light blue with the COM port number. Additionally, the successful connected will be indicated by a message saying Added.

Note: If the Added message does not appear, then try re-install USB drivers or changing the port on the computer.

Step 6: In Odin, click the PDA and select the CWM Recovery .tar file. Verify that Auto-Reboot and Re-Partition options is NOT selected.
Step 7: Double-check and click Start in Odin. The installation process will now begin.
Step 8: Once installation process is completed, unplug the USB cable to disconnect it from computer. Then switch off the phone manually (Take out the battery and put it back in).

Steps to Root Galaxy Win I8552 by Installing SuperSU via CWM Recovery
Step 9: Boot the device into CWM Recovery by pressing and holding Volume Up, Home and Power buttons together.
Step 10: In CWM Recovery, select install zip from sdcard and then select choose zip from sdcard. Now, navigate to the SuperSU .zip file that you copied earlier and confirm the installation by selecting Yes.
Step 11: Once installation process is completed, return to main recovery menu and select reboot system now.

The Samsung Galaxy Win I8552, running official Android 4.1.2 Jelly Bean, is now rooted successfully. You can now install any app that requires root permission. Verify the root status of the device by downloading Root Checker app from Google Play Store.

Thanks to all fellas at XDA who first tried out this rooting technique. This root method was originally posted via XDA-Developers original thread.

Click here to know How to Update Galaxy Win I8552 with Android 4.1.2 XXAMK1 Jelly Bean official firmware.
Read More..

How to Root Galaxy Note 2 AT T SGH I317 on Android 4 1 2 Jelly Bean Firmware

0 komentar
Samsung Galaxy Note 2 (AT&T) SGH-I317 users who have already updated their devices with Android 4.1.2 Jelly Bean, may root their devices using the tutorial below.

This tutorial uses CF-Auto-Root file released by recognised XDA Developers, Chainfire. The CF-Auto-Root file allowing Galaxy Note 2 users to root their devices easily without depending on the firmware. It completely supports Android 4.1.2 Jelly Bean and future firmware as well. Head over to the CF-Auto-Root main thread to learn more about the root method.

Note: Using this root increases your flash counter. The flash counter keeps track of how many custom firmwares you have flashed, as this voids warranty. Triangle Away can be used to reset the flash counter after installing CF-Auto-Root.

Disclaimer: Rooting voids the warranty of your device. We and the developer of this rooting procedures shall not be held responsible if any undesirable outcomes may happen to your device. use of this root guide is solely at your own risk!

Pre-requisites
1. Install USB Driver for Samsung Galaxy Note 2 on the computer.
2. Enable USB Debugging Mode on the phone by navigating to Settings >> Developer Options (Android 4.0 or later) or go to Settings >> Applications >> Development (Android 2.3 or earlier).
3. Make a backup of all your important data before following the guide.
4. Ensure the battery of the phone is charged more than 80 per cent.
5. The CF-Auto-Root file works only on Samsung Galaxy Note 2 (AT&T) SGH-I317. Applying this to any incorrect variant might brick the device. Verify the model number of the Galaxy Note 2 by navigating to Settings >> About Phone.

File Required
1. CF-Auto-Root (Mirror Link) for Galaxy Note 2 (AT&T) SGH-I317 (CF-Auto-Root-t0lteatt-t0lteatt-samsungsghi317.zip)
2. Odin 3.07

Steps to Root Galaxy Note 2 (AT&T) SGH-I317 Running on Android 4.1.2 Jelly Bean Firmware
Step 1: Extract CF-Auto-Root and Odin 3.07 files using winrar/7zip/winzip or any other extracting tool.
Step 2: Switch off the Galaxy Note 2. Then boot the device into Download Mode by pressing and holding Volume Down + Home buttons together and then press the Power button until the device turns on. Now press the Volume Up button to enter Download Mode.
Step 3: Launch Odin on the computer.
Step 4: Connect the Galaxy Note 2 to the computer using USB cable while it is in the Download Mode. Wait until Odin detects the device. When the device is connected successfully, the ID: COM box will turn yellow with the COM port number. Additionally, the successful connected will be indicated by a message saying Added. If Odin fails to detect the device then re-install USB driver
Step 5: In Odin, click the PDA button and select the CF-Auto-Root-t0lteatt-t0lteatt-samsungsghi317.tar.md5 file.
Step 6: Verify that Auto Reboot and F.Reset Time checkboxes are selected in Odin. Also, ensure the Re-Partition option in Odin is not selected.
Step 7: Double-check and click Start in Odin. The installation process will now begin.
Step 8: Once flashing completed, your phone will restart and soon you will see a PASS message with green background in the left-most box at the very top of the Odin. You can now unplug the USB cable to disconnect your device from computer.

Samsung Galaxy Note 2 (AT&T) SGH-I317 running on Android 4.1.2 Jelly Bean firmware is now rooted successfully. You can now install any app that requires root permission. Verify the root status of the device by downloading Root Checker app from Google Play Store.

Thanks to all fellas at XDA who first tried out this rooting technique. This method was originally posted via XDA-Developers original thread.

Click here to know How to Update Galaxy Note 2 (AT&T) SGH-I317 with Android 4.1.2 Jelly Bean official firmware.
Read More..

How to Root Galaxy Note 2 Sprint SPH L900 on Android 4 3 Jelly Bean Firmware

Jumat, 03 Januari 2014

0 komentar
Samsung has begun rolling out the Android 4.3 Jelly Bean update for the Sprint subscribers of the Galaxy Note 2 (SPH-L900). The new official firmware is now available as an Over-The-Air (OTA) update as well as through Samsung KIES.

Samsung Galaxy Note 2 (Sprint) SPH-L900 users who have already updated their devices with Android 4.3 Jelly Bean, may root their devices using the tutorial below.

This tutorial uses CF-Auto-Root file released by Elite Recognized XDA-Developers, Chainfire. The CF-Auto-Root file allowing Galaxy Note 2 users to root their devices easily without depending on the firmware. It completely supports Android 4.3 Jelly Bean and future firmware as well. Head over to the CF-Auto-Root main thread to learn more about the root method.

Disclaimer: Rooting voids the warranty of your device. We and the developer of this rooting procedures shall not be held responsible if any undesirable outcomes may happen to your device. use of this root guide is solely at your own risk!

Pre-requisites
1. Install USB Driver for Samsung Galaxy Note 2 on the computer.
2. Enable USB Debugging Mode on the phone by navigating to Settings >> Developer Options.
3. Make a backup of all your important data before following the guide.
4. Ensure the battery of the phone is charged more than 80 percent.
5. The CF-Auto-Root file works only on the Sprint version of the Samsung Galaxy Note 2 (SPH-L900). Applying this to any incorrect variant might brick the device. Verify the model number of the Galaxy Note 2 by navigating to Settings >> About Phone.

Files Required
1. CF-Auto-Root for Galaxy Note 2 (Sprint) SPH-L900 (CF-Auto-Root-t0ltespr-t0ltespr-sphl900.zip)
2. Odin 3.07

Steps to Root Galaxy Note 2 (Sprint) SPH-L900 Running on Android 4.3 Jelly Bean Firmware
Step 1: Extract CF-Auto-Root and Odin 3.07 files using winrar/7zip/winzip or any other extracting tool.
Step 2: Switch off the Galaxy Note 2. Then boot the device into Download Mode by pressing and holding Volume Down, Home and Power buttons together until a construction Android robot icon with a warning triangle appears on screen. Now press the Volume Up button to enter Download Mode.
Step 3: Launch Odin on the computer as an Administrator.
Step 4: Connect the Galaxy Note 2 to the computer using USB cable while it is in the Download Mode. Wait until Odin detects the device. When the device is connected successfully, the ID: COM box will turn to light blue with the COM port number. Additionally, the successful connected will be indicated by a message saying Added.

Note: If the Added message does not appear, then try re-install USB drivers or changing the port on the computer.

Step 5: In Odin, click the PDA button and select the CF-Auto-Root-t0ltespr-t0ltespr-sphl900.tar.md5 file.
Step 6: Verify that Auto Reboot and F. Reset Time checkboxes are selected in Odin. Also, ensure the Re-Partition option is NOT selected.
Step 7: Double-check and click Start button in Odin. The installation process will now begin.
Step 8: Once the installation process is completed, your phone will restart and soon you will see a PASS message with green background in the left-most box at the very top of the Odin. You can now unplug the USB cable to disconnect your device from the computer.

Samsung Galaxy Note 2 (Sprint) SPH-L900 running on Android 4.3 Jelly Bean firmware is now rooted successfully. You can now install any app that requires root permission. Verify the root status of the device by downloading Root Checker app from Google Play Store.

Thanks to all fellas at XDA who first tried out this rooting technique. This method was originally posted via XDA-Developers original thread.
Read More..

APK FILES™ They Need To Be Fed 2 APK v1 0 7 Full Cracked

Senin, 26 Agustus 2013

0 komentar
They Need To Be Fed 2 APK v1.0.7 

They Need To Be Fed 2 APK v1.0.7
Requirements: 2.3
Overview: The sequel to the popular They Need To Be Fed is finally here!
Run and jump in this 360 degree gravity platformer!

Gravity in all directions means you can never fall off, but thats not to say the game is easy!
This is the sequel to the original They Need To Be Fed, which received much acclaim. They Need To Be Fed 2 is bigger, better, full of new surprises but also "more of the same"!
Features
- 360 degree gravity
- 7 worlds to explore
- over 50 levels
- 100+ diamonds to collect
- 20 medals to earn
- classic mode
- epic mode
- groovy soundtrack by Jake Almond
- slick visual style
- secret golden beans

NEW: Epic Mode
Epic Mode will be unlocked once you complete Classic, and lets you play the game all over again but in a completely different way. Levels are upside down, full of explosions, without checkpoints(!), and new things to collect. It is accompanied by a new track from Jake Almond that is utterly epic.

They Need To Be Fed 2 is like a ridiculous ice cream flavour that you cant get enough of. A superb combination of fun & frustration! You wont find a game like it.
They are hungry... Go feed them!

Whats in this version:
- Low resolution devices: Zoom view fix
- Epic level 4-4 bug fix

This game has no advertisements

More Info:
Code:
https://play.google.com/store/apps/details?id=com.venbrux.tntbf2
Format: Apk
Size : 21mb
Idiom : English
Host : Rapidgator,Ul.to

Read More..

Copyright © 2010-2022 Android Apk | Powered By Blogger